 |
| The original plate next to the finished outfit. |
This all started in fall term this year, when I took the costume design course offered by my school. I'm a computer science major (now planning to double major with self-designed Renaissance/Medieval studies), so I thought this would probably just be an "easy" course, taken to balance out the more demanding CS and freshman preceptorial.
I was very wrong-- the course was just as demanding as the other two, but I loved just about every minute of it, especially the costume history project. After doing that presentation on Elizabethan dress, spending 50+ hours designing for 8 characters from The Tempest for the final, and building an Elizabethan corset during lab hours (when I probably should have just been doing a seam sample notebook like most of the class)...
 |
| Front and back views of the corset on Lizzie, my dressform. |
Margo (my teacher/boss) and I discussed a few possible plans of action, and eventually settled on the course as it turned out:
The History and Construction of Elizabethan English Costume:
This course will extend the Costume History project in THTR 224, studying in greater detail the clothing worn in England during the reign of Queen Elizabeth I. Methods of construction and popular materials of the time will also be examined. Extensive research will be done, and projects will include written material and the construction of several garments.So, I began to dig a little deeper into my research from the first presentation-- specifically The Tudor Tailor, the works of Janet Arnold, and the lovely Elizabethan Costuming Page. I got a little buried in it for a while, but after much waffling about the pros and cons of high-necked vs. low-necked smocks, the Alcega farthingale vs. modern patterns, and, of course, color and fabric choices, pieces started getting finished. Here they are, from the skin out:
This course is intended to be used as part of a self-designed Renaissance/Medieval Studies minor.
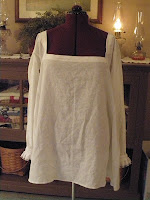
I finally decided on a low-necked smock, after what seemed like weeks of deliberation. It's made of white tissue linen, with white grosgrain ribbon ruffs decorated with machine-embroidered blackwork. I know that the ribbon isn't really period, but it was suggested by several tutorials by virtue of being cheap, readily available, and sturdy enough to not need starching. I couldn't argue with any of those, so I just went ahead with it. It looks period enough from a few feet.
 I think I made up for it with the buttons, anyway. These are handmade, thread-wrapped buttons worked over a wooden bead core. Everyone that sees them is just tickled-- including me. I think they're almost my favorite part of the whole outfit. I'm not sure why-- they're just so fun, though! The button loops are also handmade-- buttonhole stitch worked over thread bars, as described in The Tudor Tailor and other sources. Some of these will probably be showing up in the shop.
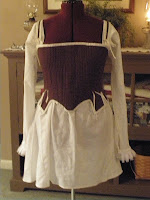
- The corset.
The corset and smock were both made from the generators at the Elizabethan Costuming page, which I highly recommend. Great for those of us who aren't quite ready to draft patterns from scratch!
- The farthingale.
Following advice from another costumer (I can't remember who, now), I removed the second hoop from the top for ease of sitting. Unfortunately, it doesn't help with walking-- at about 38" bottom diameter, this thing is wider than most of the doorways and hallways in my house.
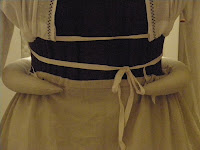
- The bumroll.
 I've heard that a lot of amateur costumers wear their rolls too high. I'm not sure if I'm doing that here, since I placed it a little lower than I felt like it could have gone, but I think like it looks okay in the finished outfit, so it probably doesn't matter too much this time. I will want to figure that out eventually, though.
- The partlet.
This is the same tissue linen and grosgrain as the smock, with twill tape ties and more of my favorite buttons. The ruff ends should probably meet in the front, but the ribbon shrank when I was embroidering it and ended up too short. I actually like it this way, though, because I feel like having ruff there under your chin in front would probably be pretty uncomfortable. It's something to remember for next time, though.

- The petticoat and forepart.
And now...
- The gown and sleeves.
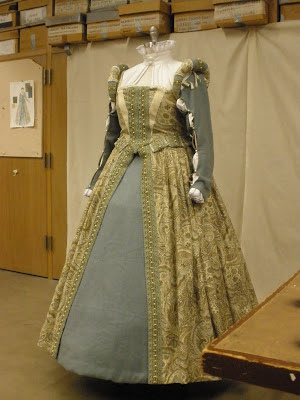
This is (I think) what was called a French gown-- tight-fitting bodice with a low, square neck, large sleeve rolls, and sleeves tapering to the wrist. It's also made of linen, and has a canvas interlining. There are a few pieces of the reed boning at the center back opening, but it's unboned other than that. It spiral laces at the back through more handsewn eyelets (which I was pretty tired of at the end of this), and like the underskirt was hand-hemmed. All of the trim is handsewn on, including about 200 glass pearls.
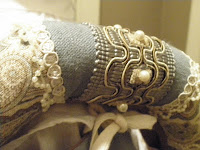 I made several major changes from the way the pattern instructed that the gown be made. First, the sleeves are removable. What I basically ended up doing was using these pattern pieces (with some of the fullness taken out of the sleeve head and all of the flared cuff removed), but following the directions from the men's Simplicity 4059. It turned out really nicely, and I love the puffs of smock that show through. The openings are caught with more pearls. I may end up making similar sleeves for the shop.
 Secondly, I constructed my bodice very differently. I didn't like that most of the seams in the pattern version are simply serged and visible inside the garment, even though it is lined. So, I did what I'm told is called "bagging," making a separate lining and sewing it right-sides-together with the outer layer, then turning it so that all edges are enclosed. That's the way I've made my previous bodices, and how I make the doll bodices, so I was more comfortable doing that anyway.
Then, in a last minute move, I decided that I didn't like the way they did the skirt either. So, I left the knife pleats on the front panels but cartridge pleated the rest of the skirt. The pleats were padded with felt, which also served the dual purpose of finishing the top of the skirt. I've always loved the look of cartridge pleats, so I was very happy to get a chance to learn the technique.
I'm still not entirely convinced that the fabric I chose looks period enough. From a distance, it looks okay, but up close it gets dangerously close to what I've heard called "blatantly non-period"-- this description is from either Margo Anderon's site or the Costuming Page, I'm not sure now. I chose it based on fiber first, though, and pattern second. I think that the natural, accurate-ish linen

- Hair/Headwear
 My hair comes courtesy of the instructions on this page, lots of hairspray, and a night sleeping on pin curls. I just happened to have a convenient pearl button earring to dangle in the part in front, as well as the blue earrings that match the forepart and sleeves almost exactly.
I think these really made the outfit when I finally got everything put on. (
- The outfit cost about $500 (but I didn't have to buy any textbooks).
- There were about 250 hand-attached pearls in the outfit.
- There were about 20 yards of material in it, and about 10 yards of trim.
- It weighs about 20 pounds.
- I didn't keep track, but it took probably 150-200 hours.
- I got an A+!



Wow, this is amazing!! That's such a labor of love, and you really deserve that A+. I was looking at making Simplicity 3782 and making pretty much the same changes as you, I really appreciate your thorough descriptions and pictures. :)
ReplyDeleteThank you so much! :)
Delete